Cake Decorating - Basic and Intermediate
This program is currently unavailable. Click here to view all of our current programs.

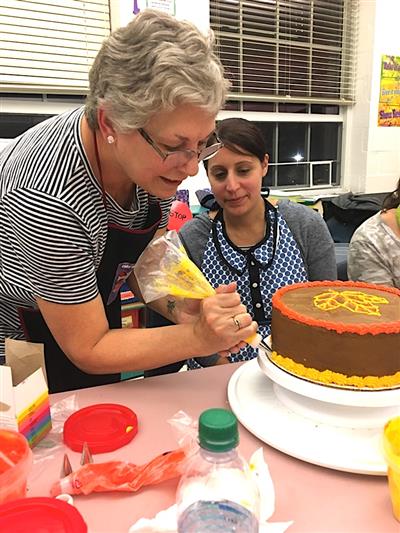
My name is Chris Silk and I look forward to meeting you and witnessing your excitement as you learn the wonderful cake decorating skills taught in my class!
Wouldn’t it be nice to make your own special occasion cakes? What a great skill to have if you love to bake and create!
My goal is to teach you the basics for classic cake decorating so that you can continue building on your skills! It is my opinion that you need to know these basic techniques in order to go on to say, royal icing flowers, or a combined buttercream/fondant cake. The possibilities are endless!
A supply list and class preparation information for each week will be provided upon registration.
MIN: 3 MAX: 10
I have been decorating cakes for many years and teaching for approximately 6 years. I have found that I get the most satisfaction out of watching students learn a craft that they can use and pass down to their family and friends, all the while enjoying yummy and beautiful treats! The "I got it now" and "WOW! I made this!" is what I live for! I hope you join in on the fun!
Acton Recreation is very excited to have Christina offer these fun classes at our new Rec Center located at 50 Audubon Drive. If you are interested in this class but this time doesn’t work for you, we’d like to know. We want to offer classes that will be available to you!
The TOOLS:
From the store:
Decorating bags (box of 50 minimum) Please purchase WILTON:
Couplers (4)
Flower 7” or 9”Nail (1)
Fondant smoother (1 optional)
Gel Colors (multiple or set)
Tips (see Kits)
Cake boards – 2” larger than the diameter of your cakes
KITS: You can piece-mail your tips, but it makes sense to buy them in a kit. (Walmart, Michaels, Hobby Lobby, and AC Moore sell kits) Remember those COUPONS!!! You can also buy them online at Amazon.com, Wilton.com and E-Bay. You will find other cool items in a kit, like off-set spatulas, flower nails, specialty tips, etc. that you can ask me about in class!
I will break down the Tip needs for my classes here so that you can compare purchasing a kit vs. one piece at a time: (In order to successfully complete your cakes, please ensure all tips noted below are available to you in class)
Round tips: #2 #3, #4, #12
Star tips: #16 (or #18), #21 and #32
Petal tip: #104 (looks like a tear-drop shape) Leaf tip: #352 (looks like a bird-beak)
Basket weave: #47
Large Special tips: #2D and/or #1M
From home:
One baked and frosted cake for weeks 2, 3 and 5 only
A batch of buttercream icing (see recipe below) for weeks 2, 3, 4, and 5
A spatula (optional 9” angled spatula)
Apron (optional)
Bottle of filtered water
Cake taker (to get your cake home safe)
Knife (butter knife will do)
Multiple Small covered bowls (4) (16oz deli containers work very well)
Paper and pen for notes
Scissors (small will do)
Toothpicks (many)
Viva brand paper towels (1 roll - white – no designs nor select-a-size)
Washcloth
Parchment paper
Cake turntable (a lazy-Susan will work too)
Powdered sugar (confectioner’s) about 1 cup
Gallon size zip-lock type bags to take your soiled tools home
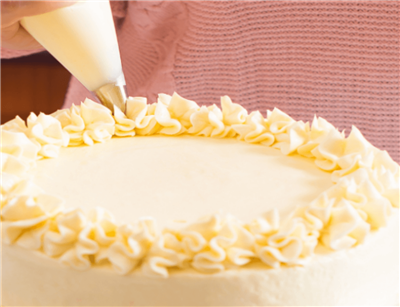
Week One: We will discuss the lists above and I will answer any questions you may have. I will demonstrate leveling and the splitting (called “torting”) of the cake for filling; as well as “dirty icing” or “crumb coating” the cake. I will then demonstrate the art of frosting the cake to look as if you used fondant!!! I will bring a bit of frosting for you to “play” with in class – so don’t bring frosting with you this first night. NOTE: You do not need a cake for this class – but please bring the supplies and tools noted above EVERY week!)
We will learn several of the trending Star and Dot techniques, including that “Dairy Queen Swirl” on top of cupcakes; and you will also learn a couple of border techniques!
Week Two: Piping Lines and Fill-in Techniques: You will need a cake that is frosted and smoothed. The colors needed will depend on the design you want to do, so just bring your white frosting and all your color gels. In this class you will learn how to write, draw and fill in your design – as well as a few extra techniques.
Week Three: Dimensional Character/Transfer Cake: You will need a cake that has been iced and smoothed. Please color your icing at home! I will teach you how transfer a design to the top of your cake and how to pipe a 3-dimensional character onto the top of your cake. You will also learn more border techniques!!!
------------------
Week Four: Rose and Leaf technique ONLY – no cake required for this class!!!!
------------------
Week Five: – Basket-weave Cake: You will learn how to use the rose technique and learn how to make leaves, star flowers, poinsettias and the basket-weave for this cake! It’s going to be a busy night, so please be prepared with your cake iced and smoothed and your icing already colored.
BUTTERCREAM RECIPE:
2 cups solid Crisco (380 grams)
2 teaspoon CLEAR vanilla flavoring
1 teaspoon CLEAR butter flavoring
6 - 7 Tablespoons bottled water
Dash of salt
8 cups (or 2 pounds) powdered sugar (divided in half)
- Combine salt, flavorings and water, stir and set aside
- Add shortening to mixer;
- Add salt/flavoring/water mixture to the shortening
- Add 4 cups powdered sugar *
- *To prevent the sugar from POOFING out… cover the mixer with a towel, start the mixer Slowly to combine; scrape the bowl. Once sugar is incorporated, add speed to the mixer and then slowly…
- Add remaining 4 cups powdered sugar and mix until incorporated*
Mix on Medium only until thoroughly incorporated – which means you don’t see clumps of sugar or shortening – if you run a spatula over the top it should be a nice, smooth texture and is fully incorporated.
NOTE: Frosting can be kept in an airtight container and will last approximately 2 weeks. It can also be frozen for future use. (No More than 3 months is recommended) Must be mixed well (spoon-mix is fine) before using again. If it becomes transparent or discolored, discard.